Saturday, April 30, 2011

Dodge Truck interior


I have been away for most of the week, in North Carolina at Pete Wernick's Jam Camp. While I was gone, a box arrived in the mail for me. A seat cover for the Dodge truck I have been restoring. Here is what the seat looked like before:


Not too good. The seat had worn down right to the springs. Initially I was going to replace the bench, but the junkyard price was $100 and up, depending on the condition. I decided to try repairing the seat myself, using some foam from a seat cushion. I found a seat cover on Ebay for $13, so I ordered it.


Looking good! Yes, I vacuumed it. Plenty of room for new gauges when I get the gasifier installed.


The seat cover. The bench seat is tight and smooth, the back less so. But overall I am quite happy.


While I was sprucing things up, I painted the air cleaner top. I like red.


Didn't want to paint this part, so I just cleaned it up real good. Here it is back together again:

Tuesday, April 26, 2011

Scrivener

I began writing a book a few weeks ago. I started like everyone does, banging away at MS Word. But I got tired of that pretty fast, and started looking for better options. Word only makes Word files; you can't transfer the formatting to any other platform. I want to make an e-book, the most popular format being epub. I already have the Calibre software for keeping up with ebooks, and for converting between ebook formats; I also have the Sigil epub software. Sigil is a flexible epub editor, but it is not very fleshed out yet. It lacks basic features like spell check and word counts. It is under development as we speak. But it does a good job at what it is for, and so for a while I typed at the text in Sigil. One feature I like is the ability to separate chapters into different HTML files within the project; this is part of the structure of epubs, and I could keep a little better organized. But the lack of features in Sigil left me wanting something better. Dad pointed me to a program called Scrivener.

Scrivener is a full writing studio. It is designed with the writer in mind, and has space for you to spread out and get organized. Bits of story go into separate documents; each document has associated synopsis, notes, keywords, and title. "Corkboard view" allows you to visually re-arrange story pieces into a different order. "Scrivenings" view shows the body of the text all strung together like one file, fully editable - the edits go into the individual files. There is a whole other folder for research items, which supports audio, images, and PDFs as well as text. On the whole, it is very flexible and intuitive. I feel like I am keeping track of the whole story much better now. I can also see at a glance how much I have (or have not) actually typed today, and the total word count. There are many other features in there that I have only started to discover.

Scrivener was developed for Mac (no surprise), and is in beta for Windows. It will be $40 for the full version in June, but you can try the beta for free right now. I'm hooked, and I think that it will be well worth the investment for any writer. Check it out!  http://www.literatureandlatte.com/scrivenerforwindows/

Saturday, April 23, 2011

Writing a book


I have a new project. Not that I needed one.


I have been hearing a lot about the "e-book revolution", and previously unknown authors such as Amanda Hocking, who has sold over 900,000 copies on Kindle so far, since she put her books up last April. If that doesn't grab your ear, then look at this: Author Barry Eisler turned down a half a million dollar advance from a publisher, deciding to self publish instead. Half a million! Something is going on here.

It turns out that authors have been getting the short end of the stick for a long time. Publishers held the keys to the press, and they dictated the terms to authors - 15% royalty rates. Who do you think got the better deal? The publisher, of course.

But now the tables have turned. E-books are increasingly popular. Authors can take their book directly to the customer through Amazon, and other vendors. They can set a price as low as 99 cents, and at $2.99 and up they keep 70% of the profits. So a book at $2.99 earns the author $2.09 per copy sold. Far more money than authors make on print paperbacks. I'm not a mathematician, but I think you will sell more books at $2.99 than at $15.

So I am writing an e-book. Not just for the money, either. I don't have any notion that I am going to hit it big, although I wouldn't mind if that happened. I don't write bestseller material; people want romantic fiction, suspense, pot-boilers. Those books have a wide appeal, and I don't begrudge them success. But I see a niche I could fill. I like to work on ambitious projects, and I can tell stories about a project I accomplished. The first one will be about restoring the Geo Metro. The second will be about building a wood-powered truck. These are not technical manuals. No step-by-step how-tos, nor exploded diagrams of exactly what I did where. I am focusing on the other stuff - the mishaps, the characters I meet, the challenges and how I overcame them, changes in my thinking about the project. That should be of a wider appeal than just "here's how I fixed this car".

This sort of book has been done before. Spectacular examples would include The Brendan Voyage and several other voyages by Tim Severin, who tells the story of the whole process. He has made a career of duplicating historic sea voyages and documenting the whole thing, while building the boats and sailing them.

One of my favorites is The Story of a Stanley Steamer, where George Woodbury restores a classic Stanley he found in a barn, and passes along a boatload of misinformation about Stanleys in general. But it is still a good story, and fun to read. I hope my book comes out that well (except for the bad information).

Another good example is Shopcraft as Soulcraft, where Matthew Crawford explains his decision to leave a high paying job at a Washington think-tank to become a motorcycle mechanic, and he tells the experiences that ensue. He adds a lot of insights along the way which are spot-on.

My book may not be earth shattering, but it is an excuse for me to start writing. I expect my second book to come out better than the first - practice makes perfect. But I still have to start somewhere. I don't have any delusions of grandeur - I will be quite pleased if I end up with a few hundred dollars. Maybe enough to fund another project, something else that I could write about...

Tuesday, April 12, 2011

Cone Roller Part II


I think the pictures tell the story quite well.....


The roller has been welded to a large flat plate of steel. I made a handle from  some electrical conduit.


The conduit handle is removable. It simply slides down over the two bolts I welded to the angle.


The ultra-precise angle gauge - consisting of a wood shim clamped to the rotating section, and a bit of scrap wood. Here's how it works:


Keep bending one spot until the mark just barely shows. Then readjust the cone for a new bend. This keeps all the bends the same on each pass.

Time for some action:


Bend on all the radius lines, in between or wherever you like as long as you are aligned with the radius. Stop on the line, and you are safe against overbending. Keep increasing the angle, and make several passes:


Getting close now. Don't overshoot the angle! I had a little tweaking to do, but I ended up with this:


Not bad for a first try, eh? The slip roll machine that this replaces looks like this:


This particular slip-roll had no price tag, instead it says "Call for price" and "Financing available".

Similar machines are anywhere from $200 to $2000 dollars. My cost? About $3 for the steel from the steelyard. Plus I burned up about four welding rods. And then there's labor....Labor is high, you know. ;)

Cone Roller


I have mentioned before that I am building a gasifier; this will require welding skills which I don't yet possess. But I see this as an opportunity, not a headache. I want to learn welding, and this is a prime opportunity.  So far my welding has been nice little beads on flat steel, and welding up scraps of steel. Here's one of my creations, showing my beginner's welds:


Today I actually built something useful, called a cone roller. Those of you who have done machining or custom fabrication work know that steel cones and cylinders are generally made from flat sheet metal, rolled in a slip-roll machine. That is the best and easiest way. Unfortunately for me, slip roll machines are many hundreds or even thousands of dollars. Since I don't plan to be rolling very many cones or cylinders, I can make do with a very simple bending device. Here's how it will look eventually (photo from member Pepe at Victory Gasworks):


I have the guts of it done, namely the hinged angle iron and the one inch bar. Next comes the handle, and then I have to find something sturdy to mount it to.


Some detail shots:


Sunday, April 10, 2011

Busy

I haven't got any photographic meal tours today. Nor can I report that some new project is underway, or that I actually finished something. I have to admit that I am behind the curve a little bit. Here is a sampling of the things on my plate right now:

  • Practice fiddle before Merlefest Jam camp in two weeks.
  • Practice welding. I have a gasifier to build.
  • Write an e-book about restoring my Geo Metro, and sell a zillion copies.
  • Split ten tons of firewood before it gets too hot...
  • Water fruit trees at a neighbor's house. Can't let this slide because they are paying me $40 a week.
  • Brush up my feeble electric guitar skills before Augusta Early Country Week. I will be in Bill Kirchen's class, and I'd rather not embarrass myself.
  • Inquire about a rebuilt title for a Dodge truck. This is the candidate for gasification.
  • Make a list of 80 songs I can sing lead on comfortably. (I usually sing the tenor harmony parts.)
  • Mow the pasture and the yard. About 6 acres total.
  • Arrange a meet-up for some of the gasifier enthusiasts in the area.
  • Write a blog post...

If I get all that done, I will be satisfied. I may be a bit scarce until things settle down.

Saturday, April 2, 2011

Pita Bread Sandwiches with Hummus


I know, I know; this is not a food blog. But I keep eating all these great meals and I feel like sharing them. Seeing pictures is not nearly as good as eating the food. It looks so good, I am getting hungry right now. Someone may be inspired to make it themselves. Yet another post with Pioneer Woman style pictures.

This is a Mediterranean style lunch - pita bread sandwiches and hummus. We don't claim to be Mediterraneans, or that the food here is 100% authentic, we just like eating pita bread and hummus.

So here we go...

Start with the dough for the pita bread. I think Maggie doubles or triples the recipe from the cookbook. Mix up the ingredients and knead the dough, either by hand or using a fancy Bosch mixer. Let the dough sit awhile. It will start rising. The expansion that follows may get out of hand....


Take the dough out and divide it into balls. Maggie is rolling them into flat circles. Don't roll them too thin, they are not going to rise much more. 


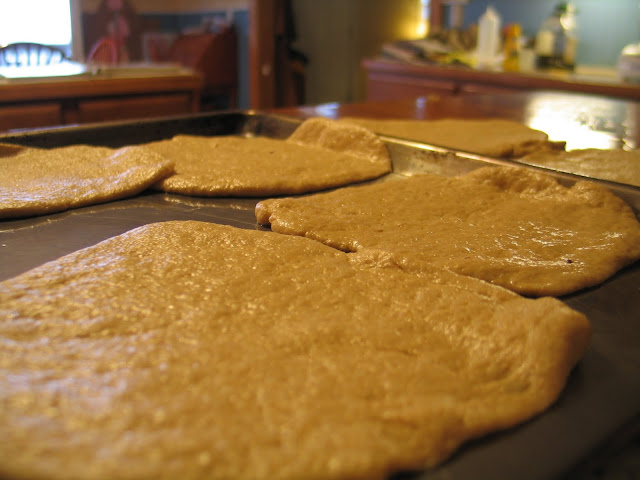
Here is the dough in the pan.


While Maggie is doing that, let's get the hummus ready. Start with some chickpeas, either from a can or from dried peas. These were dry peas and have been boiled.


Put them in a food processor with tahini, lemon juice, garlic and extra virgin olive oil. Blend until smooth, then serve in a pretty bowl with parsley on top. Add more oil on top if so desired. As you can see, we like our olive oil.


Mix up some tuna salad. No recipe is given because I figure most folks can do this, and you know how you like it. 


Back with the pita bread. It has to cook at 500 degrees, and the quickest way to do that is on a grill. Dad is the grill-master, so he gets to help out here.


The pitas are supposed to puff up and create an air pocket. They never do for us -  so we just slice open a pocket. It's all about the taste anyway, who cares how the pocket got there?


Doesn't this look delicious? My stomach is rumbling.....


Now we are ready to eat. Put some tuna in the pocket, and get some hummus quick, before it's all gone.

That hummus is good stuff....Every bit gets licked up, scraped the bowl, cleaned the plates...


                           Whole Wheat Pita Pockets

1 ¼ c       warm water                                            1 tbl        oil
1 tsp       salt                                                          2 tsp       sugar
2 ¾ c       soft whole wheat flour                               1/3 c        wheat gluten
1 ½ tsp   dry yeast                              

In large bowl, combine water, oil, salt and sugar.  Add the gluten and 1 cup of the flour, along with the yeast, and stir to mix.  Add remaining flour and knead to make a soft dough.  Add additional flour if necessary.

Put dough into a bowl, lightly oil the top and cover. Set in a warm place to rise until almost double (about an hour). Punch down dough and turn onto a lightly floured surface.  Using a sharp knife, cut dough into 8 equal pieces.  Form each piece into a ball. On a lightly floured surface, roll each ball into a 6-7 inch circle.  Do not let it get too thin!

As you roll the rounds, set them aside on a lightly floured countertop and cover loosely with a towel. Let rise for about 30 minutes, until slightly puffy. 

Preheat grill to 500 degrees. Grill  for 4-5 minutes, until puffy and just slightly browned.  Remove immediately and wrap/layer in a damp towel.  Continue to grill the other rounds.  Makes 8 pita pocket rounds.


Hummus

32 oz       chick peas                             ½  c         liquid drained from can of chickpeas
½ c          lemon juice                            ¼ c          tahini
1 tsp       sea salt                                   4              cloves garlic, crushed
¼ c          olive oil

Drain chickpeas and set aside liquid from can.  Combine remaining ingredients in food processor.  Add ½ c of liquid from chickpeas.  Blend for 3-5 minutes on low until thoroughly mixed and smooth.  Place in serving bowl, create a shallow well in the center of the hummus.  Add a small amount of olive oil in the well.  Garnish with parsley.  Serve immediately with fresh, warm pita bread, or cover and refrigerate.